
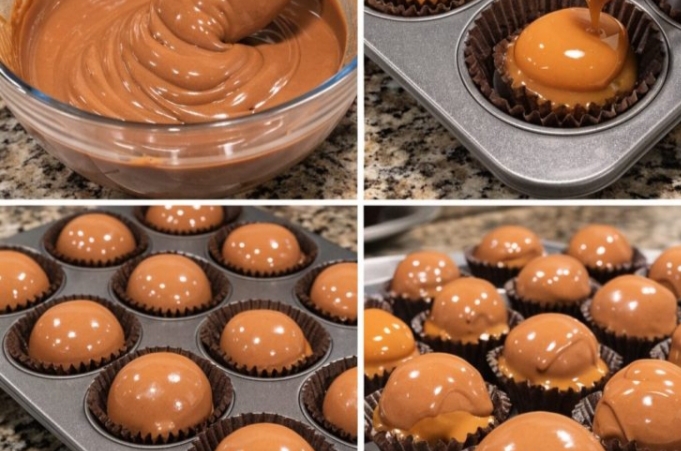
Why You’ll Love This Recipe
Who can resist the allure of a rich chocolate shell giving way to a luscious, gooey caramel center? These homemade caramel-filled chocolate cups are a true showstopper, offering a gourmet experience that rivals high-end confectioneries. They’re surprisingly simple to make, making them a fantastic project for both seasoned bakers and enthusiastic beginners. Whether you’re looking for an impressive dessert for a dinner party, a thoughtful homemade gift, or simply a delicious treat to satisfy your sweet cravings, this recipe delivers on all fronts. Plus, the process of creating these treats is incredibly satisfying, from melting the chocolate to pouring the creamy caramel filling.
Making your own chocolate candies allows you to control the quality of ingredients, ensuring a fresher and more personalized flavor profile. You can choose your favorite type of chocolate and adjust the caramel’s sweetness to your liking. These caramel chocolate cups are also incredibly versatile; you can experiment with different toppings or even add a pinch of sea salt to the caramel for a popular salted caramel chocolate experience. Get ready to impress yourself and everyone lucky enough to try these decadent delights!
Ingredient Notes
Choosing the right ingredients is key to achieving the best caramel-filled chocolate cups. Here’s a closer look at what you’ll need and why:
- Chocolate Chips or Baking Chocolate: For the chocolate shell, opt for good quality chocolate chips or baking chocolate. Semi-sweet or milk chocolate works wonderfully, but dark chocolate can also be used for a more intense flavor. The quality of your chocolate directly impacts the final taste and texture of your cups.
- Sweetened Condensed Milk: This is the base for our rich, creamy caramel filling. It provides the necessary sweetness and thickness without requiring you to make caramel from scratch, simplifying the process significantly.
- Butter: Unsalted butter is preferred to control the salt content. It adds richness and helps create that smooth, melt-in-your-mouth caramel texture.
- Brown Sugar: A touch of brown sugar enhances the caramel flavor and contributes to its deep, golden color.
- Vanilla Extract: Pure vanilla extract is essential for adding a warm, aromatic depth to the caramel filling.
- Salt: Just a pinch of salt balances the sweetness of the caramel, making the flavors pop. For salted caramel chocolate cups, you can add a bit more or sprinkle flaky sea salt on top.
Helpful Cooking or Baking Tips
- Tempering Chocolate (Optional but Recommended): For a truly professional finish and to prevent blooming (white streaks on chocolate), consider tempering your chocolate. If you’re new to tempering, a simple seed method or microwave tempering can be used. Otherwise, simply melting it carefully will still yield delicious results.
- Don’t Overheat Chocolate: When melting chocolate, do it slowly and gently. Overheating can cause it to seize and become grainy. Use a double boiler or microwave in short bursts, stirring frequently.
- Chill Thoroughly: Allowing the chocolate layers to chill completely at each stage is crucial for easy removal from the liners and for the cups to hold their shape. Don’t rush this step!
- Silicone Liners or Muffin Tin Prep: While paper liners work, silicone muffin liners can make unmolding even easier. If using paper liners, ensure they are sturdy.
- Even Caramel Distribution: Use a small spoon to carefully pour the caramel into the chocolate bases. Don’t overfill, as you’ll need space for the top chocolate layer.
- Smooth Top Layer: When adding the final chocolate layer, gently tap the muffin tin on the counter a few times to help the chocolate settle evenly and remove any air bubbles.
Ingredient Substitutions
- Chocolate Type: Feel free to experiment with different types of chocolate for the shells. White chocolate, dark chocolate, or a blend can create unique flavors.
- Caramel Flavor: For a different twist, you can add a tiny amount of a different extract to the caramel, such as almond extract or a hint of orange zest.
- Nut Butter Filling: If you’re not a fan of caramel, you could substitute the caramel filling with a thick, creamy nut butter mixed with a little powdered sugar for a peanut butter cup style treat.
- Dairy-Free Option: Use dairy-free chocolate chips and a dairy-free sweetened condensed milk alternative (often coconut-based) and vegan butter to make these treats suitable for those with dairy sensitivities.
Variations
- Salted Caramel Chocolate Cups: Sprinkle a tiny pinch of flaky sea salt on top of the caramel layer before adding the final chocolate coating, or on the finished cups.
- Nutty Chocolate Cups: Add finely chopped nuts (like pecans, walnuts, or almonds) to the caramel filling for added texture and flavor.
- Coconut Caramel Cups: Mix a small amount of shredded coconut into the caramel for a tropical twist.
- Mini Chocolate Cups: Use a mini muffin tin and smaller paper liners for bite-sized treats. Adjust chilling times accordingly.
- Decorated Cups: Drizzle contrasting melted chocolate over the finished cups, or sprinkle with edible glitter or sprinkles for a festive look.
Serving Suggestions
These caramel-filled chocolate cups are perfect on their own as a luxurious dessert or a delightful snack. They make an excellent addition to a dessert platter for parties, holiday gatherings, or special occasions. Pair them with a cup of coffee, espresso, or a glass of milk for an ultimate indulgence. They also make wonderful homemade gifts when packaged in a decorative box or cellophane bag. Imagine presenting these elegant treats to friends and family – they’re sure to be a hit!
Storage and Reheating
Store these caramel-filled chocolate cups in an airtight container at room temperature for up to one week, or in the refrigerator for up to two weeks. If storing in the refrigerator, allow them to come to room temperature for about 15-20 minutes before serving for the best texture and flavor, especially for the caramel filling to soften slightly. They do not require reheating.
Frequently Asked Questions
Can I use store-bought caramel?
Yes, you can use a good quality store-bought caramel sauce, but ensure it’s thick enough to hold its shape when chilled. If it’s too runny, it might seep into the chocolate or make the cups difficult to handle. You might need to gently warm it and then chill it to achieve the right consistency.
Why did my chocolate seize?
Chocolate seizes when it comes into contact with even a tiny amount of water or is overheated. Always use dry utensils and bowls, and melt chocolate gently over a double boiler or in short bursts in the microwave, stirring frequently.
Can I freeze these chocolate cups?
Yes, you can freeze caramel-filled chocolate cups. Place them in a single layer on a baking sheet to freeze solid, then transfer them to an airtight freezer-safe container or bag for up to 2-3 months. Thaw them in the refrigerator overnight or at room temperature for a few hours before serving.
How do I get the chocolate to be shiny?
Achieving a shiny finish often comes down to tempering your chocolate correctly. If you’re not tempering, ensure you’re not overheating the chocolate, and allow the cups to cool slowly and completely at room temperature or in the refrigerator. A quick chill can sometimes dull the shine.
Final Recipe Notes
These caramel-filled chocolate cups are more than just a dessert; they’re an experience. The combination of smooth, rich chocolate and a decadent, chewy caramel center is simply irresistible. This recipe is designed to be approachable, allowing you to create impressive confectionery masterpieces right in your own kitchen. Don’t be afraid to get creative with your toppings or flavor additions. Whether you’re making them for a special occasion or just to treat yourself, these homemade chocolate cups are guaranteed to bring a smile to your face. Enjoy every delicious bite!
Ingredients
- 2 cups (about 340g) good quality semi-sweet or milk chocolate chips, divided
- 1 cup (250g) sweetened condensed milk
- 1/2 cup (113g) unsalted butter
- 1/4 cup (50g) light brown sugar, packed
- 1 teaspoon vanilla extract
- 1/4 teaspoon salt
Instructions
- Prepare your muffin tin: Line a 12-cup standard muffin tin with dark brown paper cupcake liners. Set aside.
- Melt the first batch of chocolate: In a microwave-safe glass bowl, melt 1.5 cups of the chocolate chips. Heat in 30-second intervals, stirring well after each, until smooth and fully melted. Alternatively, use a double boiler.
- Create chocolate bases: Spoon about 1-2 tablespoons of melted chocolate into the bottom of each paper liner, spreading it slightly up the sides to form a base. Place the muffin tin in the refrigerator or freezer for 10-15 minutes, or until the chocolate is firm.
- Make the caramel filling: While the chocolate bases chill, combine the sweetened condensed milk, butter, brown sugar, and salt in a medium saucepan over medium-low heat. Stir constantly until the butter is melted and the sugar is dissolved, and the mixture begins to thicken and turn a light caramel color (about 8-10 minutes). Remove from heat and stir in the vanilla extract.
- Fill the chocolate cups with caramel: Once the chocolate bases are firm, spoon about 1-2 tablespoons of the caramel filling into each chocolate cup, leaving a small space at the top for the final chocolate layer. Return the muffin tin to the refrigerator or freezer for another 15-20 minutes, or until the caramel is firm.
- Melt the remaining chocolate: Melt the remaining 1/2 cup of chocolate chips using the same method as before (microwave or double boiler).
- Top with chocolate: Once the caramel is firm, spoon the melted chocolate over the caramel layer in each cup, spreading it gently to cover the caramel completely and create a smooth top. Gently tap the muffin tin on the counter a few times to release any air bubbles and help the chocolate settle evenly.
- Chill until set: Return the muffin tin to the refrigerator for at least 30-60 minutes, or until the chocolate cups are completely firm. Once set, carefully remove the caramel-filled chocolate cups from the muffin tin and enjoy!
- Prep time: 30 minutes
- Cook time: 10 minutes
- Total time: 1 hour 15 minutes
- Servings: 12 caramel chocolate cups