
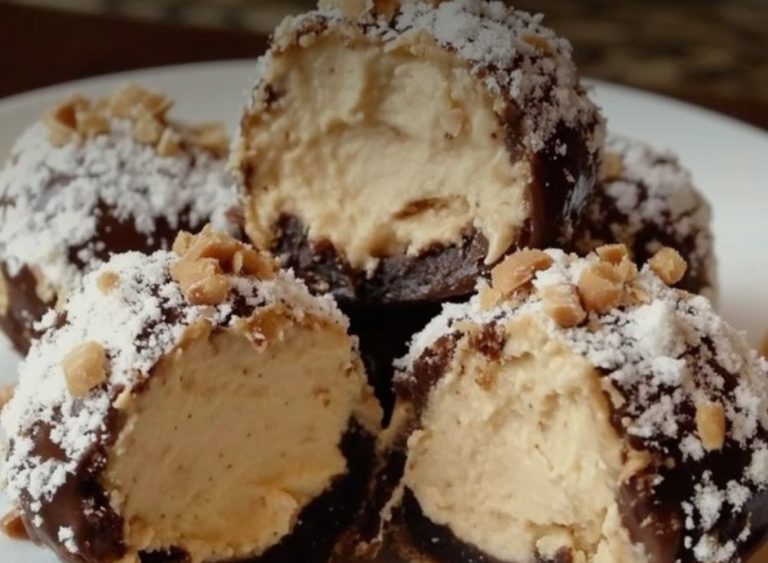
No-Bake Peanut Butter Cheesecake Balls are an irresistible treat that combines creamy peanut butter and smooth cream cheese into bite-sized delights. These no-bake dessert truffles are perfect for anyone craving a quick, rich, and easy-to-make sweet snack without needing an oven. Whether you have a busy schedule or simply want a fuss-free dessert, these cheesecake balls offer a delicious solution that requires minimal effort.
This recipe is ideal for busy home cooks, peanut butter lovers, or anyone looking for a simple yet decadent dessert. The combination of peanut butter and cream cheese creates a luscious filling coated in silky chocolate and topped with crunchy peanuts, making these cheesecake balls a crowd-pleaser at any gathering. With just a handful of ingredients and about 20 minutes of prep time, you can whip up a batch that’s perfect for parties, snacks, or a quick indulgence.
Why you’ll love this No-Bake Peanut Butter Cheesecake Balls recipe
- They require no baking, making the preparation quick and convenient for any occasion, saving time and energy.
- The creamy peanut butter and cream cheese filling offers a rich, smooth texture that melts in your mouth, delivering indulgence in every bite.
- The chocolate coating adds a perfect balance of sweetness and slight bitterness, enhancing the overall flavor profile beautifully.
- These cheesecake balls are perfectly portioned as bite-sized treats, ideal for parties, gift-giving, or portion control.
- The recipe is straightforward with simple ingredients, making it easy to prepare even for beginners or those with limited kitchen experience.
Ingredients
- 8 oz cream cheese, softened
- 1 cup creamy peanut butter
- 1 1/4 cups powdered sugar, plus extra for dusting
- 1 tsp vanilla extract
- 1 1/2 cups semi-sweet chocolate chips
- 1 tbsp coconut oil or butter
- 2 tbsp finely chopped peanuts
This recipe yields 12 to 14 balls and takes about 20 minutes to prepare with no cook time. The key ingredients include softened cream cheese, which provides a smooth, creamy base essential for the perfect cheesecake texture. Using creamy peanut butter ensures a rich, cohesive filling, while powdered sugar sweetens and thickens the mixture to the ideal consistency for shaping. Semi-sweet chocolate chips, when melted with coconut oil or butter, create a glossy, silky coating that hardens with a satisfying snap. Finely chopped peanuts add a contrasting crunch and extra nutty flavor as a garnish. Selecting high-quality peanut butter without added oils or sugars and fresh, full-fat cream cheese will significantly enhance the texture and overall taste of your cheesecake balls.
Instructions
- Beat the cream cheese: Start by beating the softened cream cheese until it becomes smooth and creamy, ensuring no lumps remain. Use a hand mixer or stand mixer for best results, scraping down the sides of the bowl as needed.
- Combine peanut butter and vanilla: Add the creamy peanut butter and vanilla extract to the cream cheese and mix thoroughly until fully combined and uniform in texture. This step blends the flavors evenly throughout the filling.
- Incorporate powdered sugar: Gradually add the powdered sugar, stirring continuously until the mixture is thick enough to scoop and shape without sticking excessively. The powdered sugar also balances the peanut butter’s saltiness with sweetness.
- Chill the mixture: Place the mixture in the refrigerator for 30 to 45 minutes, allowing it to firm up so it’s easier to roll into balls. Chilling prevents the filling from being too soft and sticky to handle.
- Form the balls: Scoop out portions of about 1 inch and roll them into smooth balls. Arrange them evenly on a tray lined with parchment paper or a silicone mat to prevent sticking and facilitate freezing.
- Freeze to firm: Freeze the formed balls for 15 to 20 minutes to help them hold their shape during the chocolate coating process. This step is crucial for preventing melting and maintaining a neat appearance.
- Melt chocolate and coconut oil: Gently melt the semi-sweet chocolate chips with the coconut oil or butter until smooth and glossy, stirring frequently to avoid burning. Use a double boiler or microwave in short bursts, stirring in between.
- Dip the balls: Using a fork or dipping tool, dip each cheesecake ball into the melted chocolate, allowing excess chocolate to drip off before placing back on the lined tray. This creates a thin, even chocolate shell.
- Add toppings: Immediately sprinkle the chocolate-coated balls with finely chopped peanuts and a light dusting of powdered sugar once the coating starts to set. This adds texture and visual appeal before the chocolate hardens completely.
Tips for the best results
- Ensure the cream cheese is fully softened: Softened cream cheese blends more easily and prevents lumps, resulting in a smooth and creamy filling. Cold cream cheese can cause uneven texture and make mixing difficult.
- Chill the mixture properly before rolling: Cooling the filling firms it up, making it less sticky and easier to handle. This step helps you form perfectly shaped balls without them sticking to your hands.
- Freeze the balls before dipping: Freezing firms the balls so the chocolate coating sets quickly and stays neat. It also prevents the filling from melting when dipped in warm chocolate.
- Melt chocolate gently over low heat: Using a double boiler or low microwave power reduces the risk of burning the chocolate, which can cause it to seize or taste bitter. Stirring frequently ensures even melting and a shiny finish.
- Use coconut oil or butter to thin the chocolate: Adding a small amount of fat makes the melted chocolate smoother and easier to coat the balls evenly. It also helps the chocolate harden with a nice sheen and crisp texture.
- Store the balls in an airtight container in the refrigerator: Keeping them sealed prevents moisture from softening the chocolate shell and preserves the creamy texture of the filling for up to a week.
Variations and substitutions
- Use crunchy peanut butter instead of creamy for added texture inside the balls, introducing delightful nutty bits throughout the filling.
- Substitute semi-sweet chocolate chips with dark or milk chocolate based on your preference, adjusting sweetness and bitterness as desired.
- Replace peanuts with chopped almonds or pecans for a different nutty crunch and flavor profile, customizing the garnish to suit your taste.
- For a vegan version, use dairy-free cream cheese and vegan chocolate chips to accommodate dietary restrictions without sacrificing flavor.
- Add a pinch of cinnamon or cayenne pepper to the filling for a subtle spicy twist that enhances the peanut butter’s natural flavor.
Serving suggestions
No-Bake Peanut Butter Cheesecake Balls make excellent party appetizers or sweet treats to enjoy with coffee or tea. Serve them chilled on a decorative platter, garnished with extra chopped peanuts or a drizzle of melted chocolate for a festive touch. Their bite-sized nature makes them perfect for buffets, holiday gatherings, or as homemade gifts. For a fuller dessert experience, pair these cheesecake balls with fresh fruit such as sliced strawberries or raspberries, or alongside a scoop of creamy vanilla ice cream, which complements the rich peanut butter and chocolate flavors beautifully.
Storage and reheating
Store the cheesecake balls in an airtight container in the refrigerator for up to one week to maintain their creamy texture and fresh flavor. Avoid leaving them at room temperature for extended periods to prevent melting or spoilage. For longer storage, freeze them for up to one month by placing them in a freezer-safe container with parchment paper between layers to prevent sticking. To serve after freezing, thaw the cheesecake balls in the refrigerator for several hours or overnight. These no-bake treats are best enjoyed cold and do not require reheating, as warming may soften the chocolate coating and alter the texture.
Frequently asked questions
Can I use crunchy peanut butter instead of creamy?
Yes, using crunchy peanut butter will add a pleasant texture inside the cheesecake balls. While the filling may be slightly less smooth, the crunchy bits provide an enjoyable contrast that many find appealing. Just be sure to mix thoroughly so the texture is evenly distributed.
How long can I store these cheesecake balls?
You can keep the balls in the refrigerator for up to one week in an airtight container, which preserves their freshness and texture. For longer storage, freezing is recommended for up to one month. When ready to eat, thaw them slowly in the refrigerator to maintain the best flavor and consistency.
Is it necessary to chill the mixture before rolling?
Chilling the mixture is important as it firms up the filling, making it easier to scoop and roll into balls without sticking to your hands. Without chilling, the mixture may be too soft and sticky, resulting in misshapen balls and a messier preparation.
Can I use a different type of chocolate for coating?
Absolutely. Semi-sweet chocolate is traditional and offers a balanced sweetness, but you can use milk chocolate for a sweeter, creamier coating or dark chocolate for a richer, slightly bitter contrast. Adjust the amount of coconut oil or butter if needed to achieve the desired consistency.
Are these cheesecake balls gluten-free?
Yes, this recipe is naturally gluten-free as it contains no flour or gluten-containing ingredients. However, always check your ingredients, especially the chocolate chips and peanut butter, to ensure they are certified gluten-free if you have sensitivities or celiac disease.
Final thoughts
No-Bake Peanut Butter Cheesecake Balls are a simple yet decadent dessert perfect for any peanut butter fan or anyone looking for an effortless sweet treat. Their creamy filling and chocolate coating combine beautifully to create a delightful bite-sized indulgence. With minimal prep time and easy-to-find ingredients, they are an excellent choice for quick desserts, parties, or thoughtful homemade gifts. Give this recipe a try and enjoy the ease and deliciousness of homemade no-bake cheesecake balls that everyone will love.